
To install
FreeQ:
simply drag the contents of the zip file to the directory you want
(usually in your rapidQ directory). When it runs for the first time, it
attempts to find the rapidQ compiler, libraries and include files
folder and if FreeBasic is installed. You will see the message "setting
program defaults..."
Note: At
this point make all configuration changes (Format menu -> Options)
that should be permanent, then click the "Save" button at the bottom.
This will be output
to the FreeQ.ini Under most
circumstances be sure to turn on "set path to application" in the
compiler tab.
Learning how to use FreeQ should be simple
but there are a few things it can do nicely
> Project files
project files are a collection of multiple files and all special
settings:
Open multiple files or Drag & Drop mulitple files to the IDE
set up custom settings, such as multilanguage highlighting for each
opened file.
You can even set FreeBasic as default (see Format -> Options), or
set modules to be compiled by freebasic (Right-click tab control)
Once you like it, go to the configuration form (Format menu ->
Options) and click
"save as Project" it will save it as a .QProj file (basically an ini).
You can drag-n-drop this .Qproj file to the IDE and it will
automatically load the project
> Application wizard
You can configure the IDE for a welcome screen to create an RQ,
RQ+FreeBasic, FreeBasic, FreeBasic DLL project or simply click a prior
project file
> Quick hint
Click on a keyword and press F1, you will get a window of definitions,
helpful tips, and properites/methods for Objects. (Press ctrl and then
right-click on a keyword also works). If found a quick hint is shown.
> Content sensitive help
Highlight a keyword in the editor, press Alt-F1 and the item
comes up in a CHM help file
You can set each file as an RQ module (default) or as a FreeBasic
module for context sensitive help.
> AutoComplete
while typing a keyword, press Ctrl-period, you can select from the
list. The case is kept the same as the last letter typed. You can use
it to look up just about any keyword.
> Find definition
Ever wondered if a variable is an Integer, QForm, or whatever? Click
on
the variable name and press Alt-D. It will attempt to find where the
variable was declared. You can return back to your starting point
> Leave your compiled RQ app decompressed
if you have the location of UPX.Com set on "external apps" tab. You
can
select decompress exe.
>FreeQ IDEa can automatically open include files
In the right panel, click the "includes" tab. You will see all the
include files used in the source code. Now click the file and it
should
open in the editor. If it cannot find the file it can search for an
include file of the same name at http://rapidq.phatcode.net/include/
>Automatically
add high
resolution Icons to the program
In the top right panel, click the icon bitmap

Answer 'no' to using the
default Icon.
You will then get a file dialog to pick a new .ico file to use. If you
select a high resolution ico file (up to 256x256 pixels, if running
WIndows Vista or higher), then you will also need to tell FreeQ IDEa
where the UPX and Reshacker program tools are located. Click the Menus
Format -> Options -> External apps and then set the locations
then be sure to click the Save button:

> Form Designer
view the left panel (View Menu -> Properties) you can click the
insert new form, or double click an existing form to re-edit. Exit out
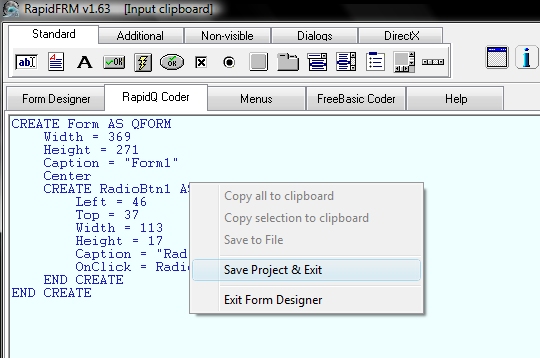
of the form designer by right clicking "save project.." in the RapidQ
or FreeBasic tab.
Automatically converts between the 2 languages! Not all features are
supported.
>How to create a GUI program:
1) Let's start with a
new form, and
double-click the "new form at cursor" in the object viewer pan (press
Alt-F2 if not visible)

2) This will bring up
the form designer.
Here we click on the radiobutton icon at top then click on the form.
Reposition and size the radiobutton as you like by dragging on the
corner dots.
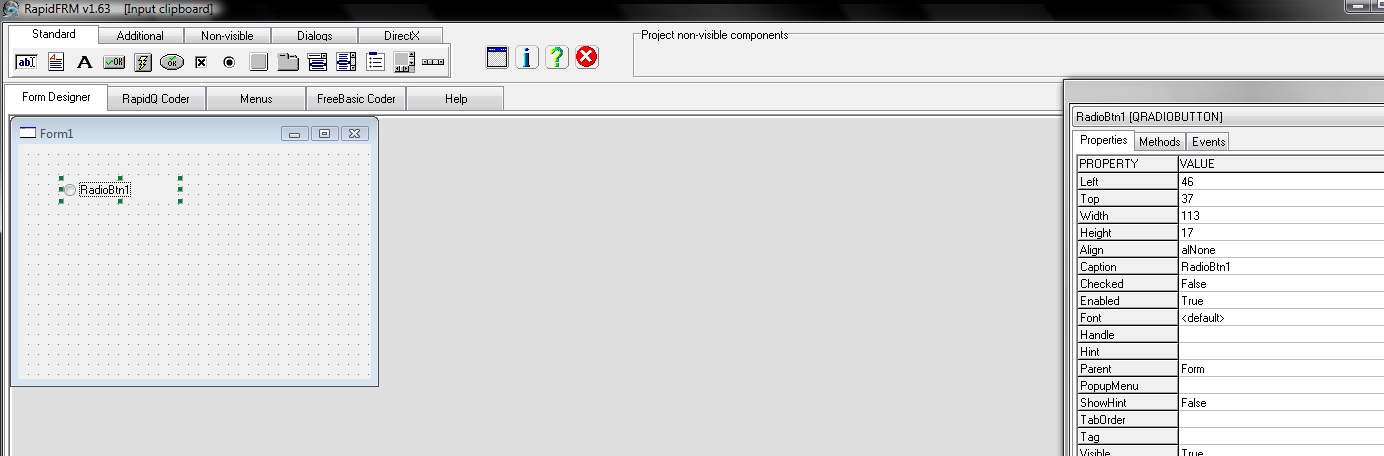
3) Now we want to do something when the user clicks the radiobutton. Do that by telling the program to set its event in the form on the right.
Here we enter "radioClicked" in the OnClick event. This will cause the program to jump to a SUB called RadioClicked when the button is clicked.

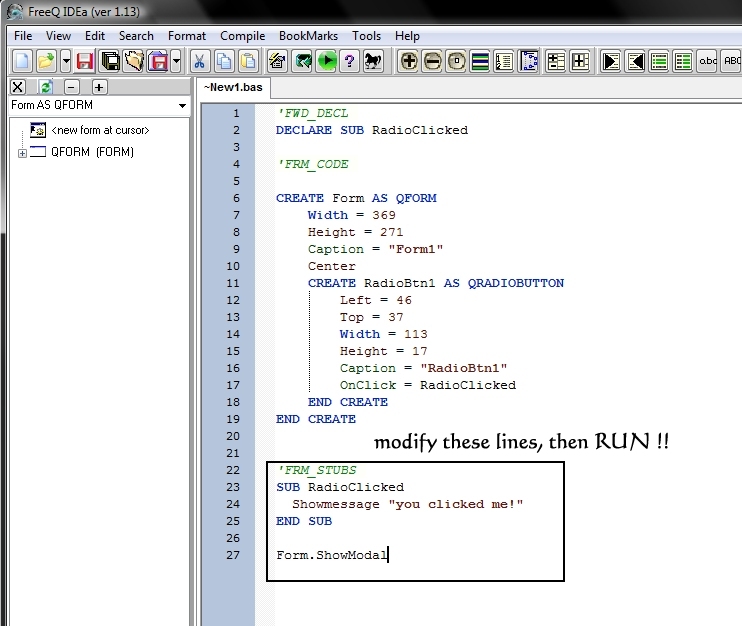
5) Now you are back in FreeQ IDEa. Notice all the form code and RadioClicked SUB has been added.
To finally run your
program, we add some
code to the RadioClicked
SUB to show you clicked the radiobutton.
Finally we add a Form.ShowModal line to make the form appear and wait for an event, or close exe, to happen.
|
Disclaimer : I have made every effort to ensure that this tutorial is accurate, but you do use it entirely at your own risk. I cannot accept any liability for it failing to work properly or giving the wrong output nor for any errors in this manual. |